PREMIUM ADD-ON ✨This integration is only available to users with a specific paying add-on. Please
contact us to get access to Salesforce CPQ integration.
This is extension package of the base package: Lago for Salesforce CRM. Base package must be installed to install CPQ package.
Object mapping
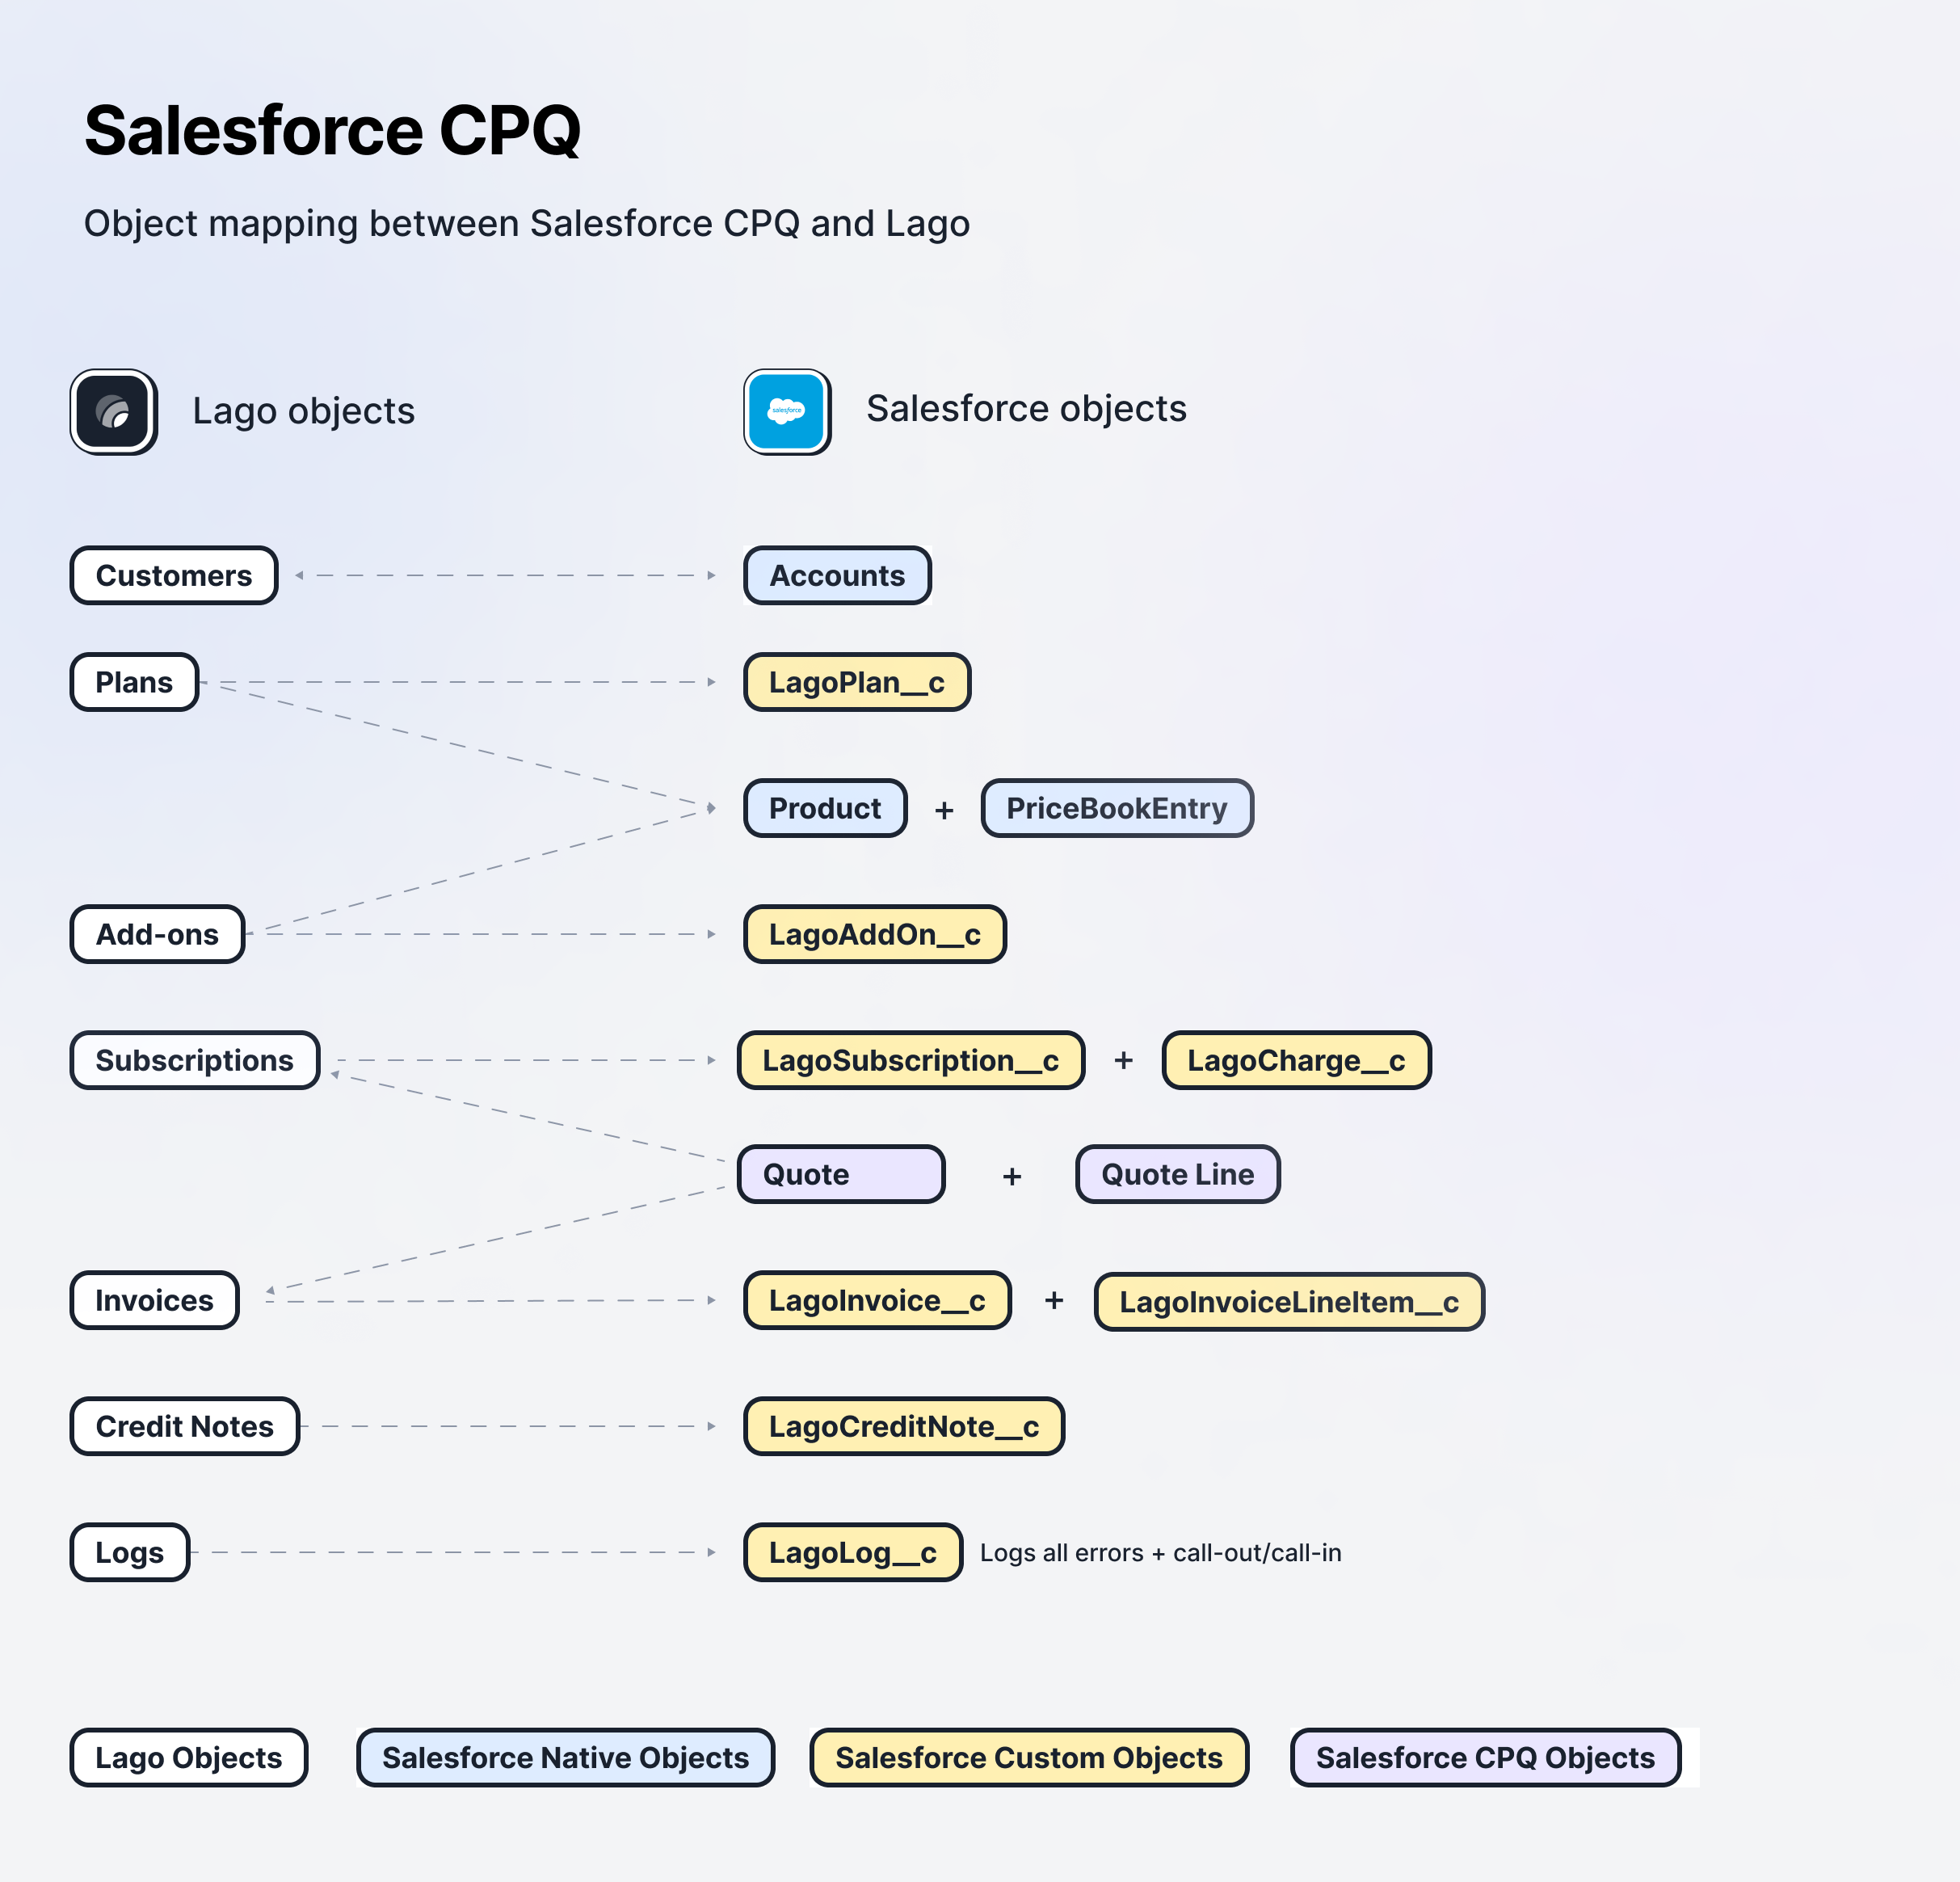
Lago to Salesforce CPQ object mapping
Pre-requisite:
- Salesforce CPQ (> Summer ‘19)
- Install Lago For Salesforce CRM Package Lago Base Package
I. Integration configuration
Install Salesforce CRM Package and complete Integration configuration step
Install Salesforce CPQ Package
To gain premium access to our Salesforce Package application, please don’t hesitate to contact us. You can initiate the installation process by clicking on the provided link, which will direct you to the installation page where you can follow step-by-step instructions for a seamless integration. If you have any questions or need assistance during the installation, our dedicated support team is here to help you every step of the way.
Install Lago Salesforce App package
- We recommend selecting the “Install for all users” option;
- Click on the “Install” button;
- Make sure to check the box to grant access to these third-party websites; and
- Once completed, you’ll have successfully installed the Lago Salesforce App.
Please note that the installation process may take a few minutes to complete.
However, rest assured that you will receive an email confirmation once the installation is finished.
II. Configuration to sync data
Assign Permission:
AssignLago CPQ Permission to users who needs to access Lago for Salesforce CPQ.
Include Lago Fields in ‘Quote Line Items editor’ layout
Update the “Edit Line” which is available in Quote Layout to enter the details related to lago fieds in QuoteLine by following below steps:- Go to Setup
- Click on Object manager
- Go to
Quote Lineobject - Click on `field sets.
- Select edit ‘Line Editor` field set.
6 Make sure following fields are available in field set:
- Lago Name
- Lago External Id
- Lago Billing Time
- Lago Start Date
- Lago End Date
III. Actions from Salesforce to Lago
Beyond just syncing data from Lago to Salesforce, you can also initiate actions in Lago directly from Salesforce. You can leverage SalesforceFlows to execute actions in Lago. Lago provides customizable templates for creating subscription from Salesforce Accounts, directly assigning subscriptions to customers from Salesforce, creating one-off invoice from salesforce.
Create customers from Lago to Salesforce CRM
Create subscriptions (automation)
Assigning a plan to a customer, adjusting negotiated prices, and initiating the subscription upon accepting a quote represents a key action from Salesforce to Lago. To assign a subscription and set prices in Lago directly from Salesforce, use the provided two flows via following Lago Flow templates.Flow 1: LagoCPQ Template - Quote Line After Insert
This Flow is used to update Subscription External Id if it is null
- Log into your Salesforce instance;
- Access the Setup section via the settings gear icon in Salesforce;
- Find and select
Flowsunder Process Automation in the sidebar; - Locate and open the
LagoCPQ Template - Quote Line After Insert; - Click ‘Save As’ to create and save your own version of the template; and
- Do not forget to click the
Activatebutton to activate your flow.
Flow 2: Pre-requisite from Lago to Salesforce CRM package: Lago Template - Create Subscription in Lago on Subscription Creation/Update
This Flow is used to create subscriptions in Lago from Salesforce
- Log into your Salesforce instance;
- Access the Setup section via the settings gear icon in Salesforce;
- Find and select
Flowsunder Process Automation in the sidebar; - Locate and open the
Lago Template - Create Subscription in Lago on Subscription Creation/Update; - Click ‘Save As’ to create and save your own version of the template; and
- Do not forget to click the
Activatebutton to activate your flow.
SyncToLago checkbox is checked. You can customize this flow to suit your specific needs.
Flow 3: LagoCPQ Template - Create Lago SObject Records Using Quotes
This Flow is used to create Lago subscriptions records in Salesforce when Quote status is changed to Approved
- Log into your Salesforce instance;
- Access the Setup section via the settings gear icon in Salesforce;
- Find and select
Flowsunder Process Automation in the sidebar; - Locate and open the
LagoCPQ Template - Create Lago SObject Records Using Quotes; - Click ‘Save As’ to create and save your own version of the template; and
- Do not forget to click the
Activatebutton to activate your flow.
Terminate Subscription
We can terminate the subscription from Salesforce to lago only if the subscription is already synced to lago(status is active or pending). Go to Lago Subscription record in Salesforce, and checkTerminate Subscription checkbox.
As soon as
Terminate Subscription is checked it will terminate the subscription in Lago. It is handled from the backend via trigger.Debugging & logs
To ensure seamless data synchronization between Lago and Salesforce, every action and data transfer is meticulously logged. These logs are accessible directly through the Lago package for comprehensive debugging and analysis:- Navigate to ‘Lago Base Configuration’: This is your starting point for accessing the debugging tools. and
- Access Logs: Click on the ‘Logs’ tab to view a detailed record of all activities.