Watch the demo video
Integration setup
To set up the integration with Stripe through the user interface:- In the side menu, select “Settings”;
- Select the “Integrations” tab;
- Click “Stripe” and add a new connection;
- Give this new connection a name and a code;
- Enter your Stripe API key (locate your API key); and
- Click “Connect to Stripe” to confirm.
By default, customers created in Lago are not automatically created in Stripe.
If you want your Lago customers to be added to Stripe, you need to activate
this option (learn more).
Redirect url after checkout
After establishing the connection with Stripe, set a success URL where your end customer will be directed after completing the checkout. Please note that if it’s not defined, your end customer will be redirected to Stripe’s website. Please note that you can edit or delete the redirect URL, and this will only affect new checkout URLs created.Customer information
To collect payments automatically, the customer must exist in both the Lago and Stripe databases.New customer
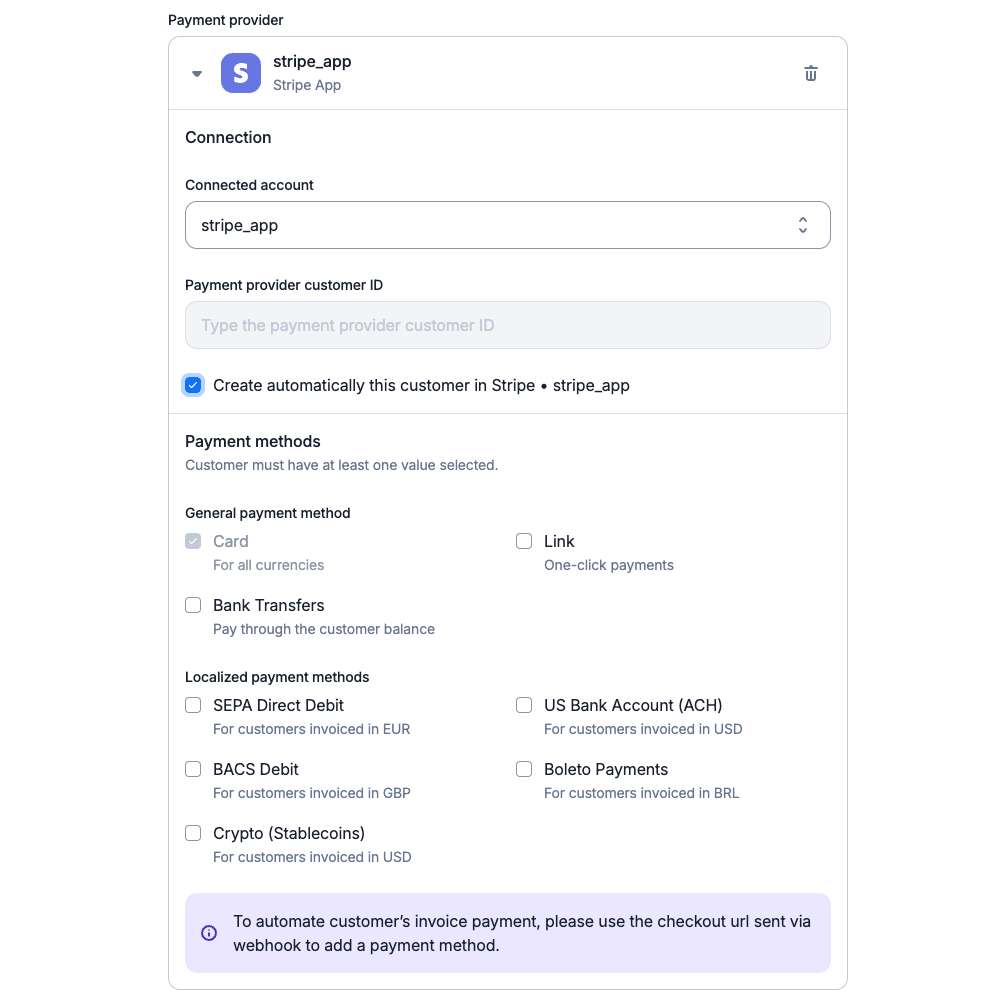
If the customer does not already exist in Stripe, you can first create them in Lago, either via the user interface or the API. When adding customer information, you must:- Define Stripe as the default payment provider;
- Leave the field associated with the Stripe customer ID blank;
- Enable the option to automatically create the customer in Stripe; and
- Define payment method options for this customer. Possible values are
card,link,sepa_debit,us_bank_account,bacs_debit,boleto,cryptoorcustomer_balance.

Existing customer
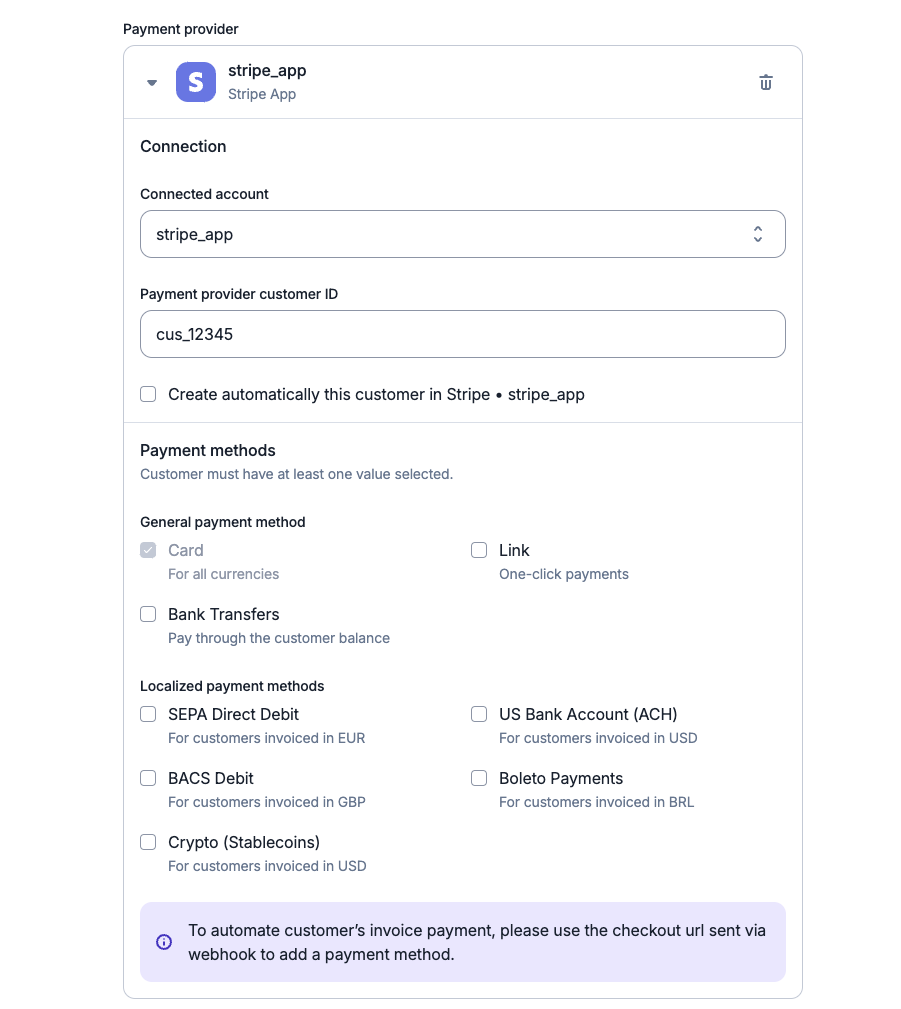
If the customer already exists in Stripe but not in Lago, you should create the customer record, either via the user interface or the API. When adding customer information, you must:- Define Stripe as the default payment provider;
- Provide the Stripe customer ID;
- Disable the option to automatically create the customer in Stripe; and
- Define payment method options for this customer. Possible values are
card,link,sepa_debit,us_bank_account,bacs_debit,boleto,cryptoorcustomer_balance.

Supported payment methods
Lago’s Stripe integration accommodates a variety of payment methods, both generic and region-specific. The checkout URL provided by Lago is designed to handle multiple payment options seamlessly.General payment methods
Card payments
Card payments
Lago’s Stripe integration includes a universal card payment method that supports various currencies, ideal for global transactions.
This method is set as the default to facilitate recurring payments, ensuring Lago can process charges for your customers efficiently.
Link
Link
For card transactions, you can enable the Link feature to offer one-click payments.
Link automatically fills in your customers’ payment information, ensuring a seamless and secure checkout experience.
Bank Transfers (Customer Balance)
Bank Transfers (Customer Balance)
Lago now accepts invoice payments via Stripe bank transfers (customer balance). Supported methods include:
- JPY: Japan
- GBP: United Kingdom
- EUR: Specific SEPA countries (see Stripe documentation)
- MXN: Mexico
- USD: United States, United Kingdom, and select SEPA countries
Localized payment methods
SEPA debits (EU only)
SEPA debits (EU only)
For European customers, Lago supports Stripe SEPA Debit (Single Euro Payments Area).
Accepting a mandate through this method authorizes you to debit your customers’ accounts for recurring payments via Lago.
The designated payment method for SEPA transactions within Lago is identified as
sepa_debit.
It’s important to note that this payment option is exclusive to invoices in EUR currency.ACH debits (US only)
ACH debits (US only)
For US-based transactions, Lago integrates Stripe ACH Debit, leveraging the Automated Clearing House for electronic bank-to-bank payments.
Upon accepting a mandate, you gain authorization to execute recurring debits from your customers’ accounts through Lago.
The designated payment method for ACH transactions within Lago is identified as
us_bank_account.
It’s important to note that this payment option is exclusive to invoices in USD currency.BACS debits (UK only)
BACS debits (UK only)
For UK transactions, Lago integrates Stripe BACS Debit, utilizing the UK’s BACS system for direct bank-to-bank payments.
By accepting a mandate with this method, you’re authorized to initiate recurring debits from your customers’ accounts through Lago.
The specific payment method for BACS transactions within Lago is designated as
bacs_debit.
It’s important to note that this payment method is exclusively for invoices in GBP currency.Boleto (BRL only)
Boleto (BRL only)
For transactions in Brazil, you can process payments using Boleto vouchers.
In Lago, this payment method is identified as
boleto.
Note that Boleto is only valid for invoices denominated in Brazilian Real (BRL). Additionally, Boleto payments cannot be refunded and are unlikely to be successfully disputed.Crypto (Stablecoins)
Crypto (Stablecoins)
Lago invoices can be paid via Stripe Crypto for USD-denominated invoices only. Please note that payments must be made using stablecoins, such as USDC or USDP.
Stripe Checkout: storing customer’s payment method information
Checkout page shows only selected payment methods for customers.
checkout_url:
Regenerate checkout link on demand
In cases where your end customer has not had the opportunity to complete the checkout process to inform their payment method or wishes to modify the saved payment information, you can generate a new checkout link using the designated endpoint.Default payment method
When you add a new payment method in Stripe, Lago automatically sets it as the default. This guarantees that Lago uses the latest payment method for a customer. However, if you manually designate one of multiple payment methods as the default, Lago will use it for payments instead the most recent one.Payment intents
Once Stripe is connected and the customer exists in both databases, you can start collecting payments.Succeeded payments
Each time a new invoice with an amount greater than zero is generated by Lago, a payment intent will automatically be created. Stripe will record the invoice ID and process the payment. If the payment is successful, the status of the payment will switch frompending to succeeded.
Failed payments
If the payment fails, the status of the payment will switch frompending to
failed and Lago will generate an invoice.payment_failure
webhook.
Payments requiring validation
When a payment requires multi-step authentication, such as 3D Secure (3DS), Lago triggers apayment.requires_action webhook.
This webhook provides the details for completing the 3DS process. Depending on your integration, you’ll get a Stripe Checkout URL or details
to use in your integration (like with Stripe Link).
The invoice will be marked pending and the payment as processing until the 3DS process is completed.
It’s important to note that payments in Europe can request 3DS due to SCA regulations
and most payments in India require 3DS authentication due to RBI regulations.
Minimum payment amount
If the new invoice amount falls below the minimum amount supported by Stripe, the payment status will remain aspending.
Payment disputes
In the event of a lost payment dispute within Stripe, Lago initiates an automatic response by marking the relevant invoice as disputed lost. This action involves populating thedispute_lost_at field with the timestamp when the dispute was lost. Following this update:
- The invoice becomes non-voidable;
- Generating a credit note is possible; however, refunding the payment back to the original payment method is not permitted; and
- The invoice cannot be resent for collection.
Restricted Stripe API key
In case you’re using Lago Cloud, and want to limit the scope granted to the Stripe API key which is shared with Lago, you can create a restricted Stripe API key. At minimum, you’ll need to grant it the following resource permissions, otherwise Stripe integration will not work properly:- Core
- Charges -
Write(to create refunds when creating credit notes) - Customers -
Write - Events -
Read(to receive webhooks with event details) - Funding Instructions -
Write(to create and read bank details) - Payment Intents -
Write(to create payments) - Payment Methods -
Write(to update customer’s payment methods)
- Charges -
- Checkout
- Checkout Sessions -
Write(to generate checkout URLs)
- Checkout Sessions -
- Webhook
- Webhook Endpoints -
Write(to create and update webhooks)
- Webhook Endpoints -